
Access a Raspberry Pi terminal through a Raspberry Pi Pico and UART
A Raspberry Pi can be controlled through a serial console over UART. Since a regular computer usually has no direct GPIO UART port, this guide uses a Raspberry Pi Pico as the USB-UART bridge between the computer and the Raspberry Pi.
Serial-port terminal in action
The video shows the real macOS flow: finding the Pico as a USB serial port, opening the 115200-baud connection, and getting a Raspberry Pi terminal through UART.
1. Parts needed for the UART link
- A Raspberry Pi Pico or Pico H that will act as the USB-UART bridge.
- The Raspberry Pi you already want to control through the serial console.
- A data-capable USB cable to connect the Pico to the computer. Some USB cables are charge-only.
- Three Dupont wires for TX, RX, and common GND.
- A Windows, macOS, or Linux computer to open the serial terminal.
2. Turn the Pico into a USB-UART adapter
This guide uses a custom precompiled UF2 firmware. That firmware turns the Pico into a 115200-baud USB-UART bridge using GP0 as TX and GP1 as RX.
- Disconnect the Pico from the computer.
- Hold down the BOOTSEL button.
- Plug the Pico in over USB while keeping BOOTSEL pressed.
- Release the button when a USB drive, usually named RPI-RP2, appears.
- Download the UF2 from this page.
- Copy the .uf2 file to the RPI-RP2 drive.
- Wait until the drive unmounts and the Pico reboots automatically.
- Unplug and reconnect the Pico if needed.
After installing it, the Pico should appear on the computer as a USB CDC serial port.
3. Wiring
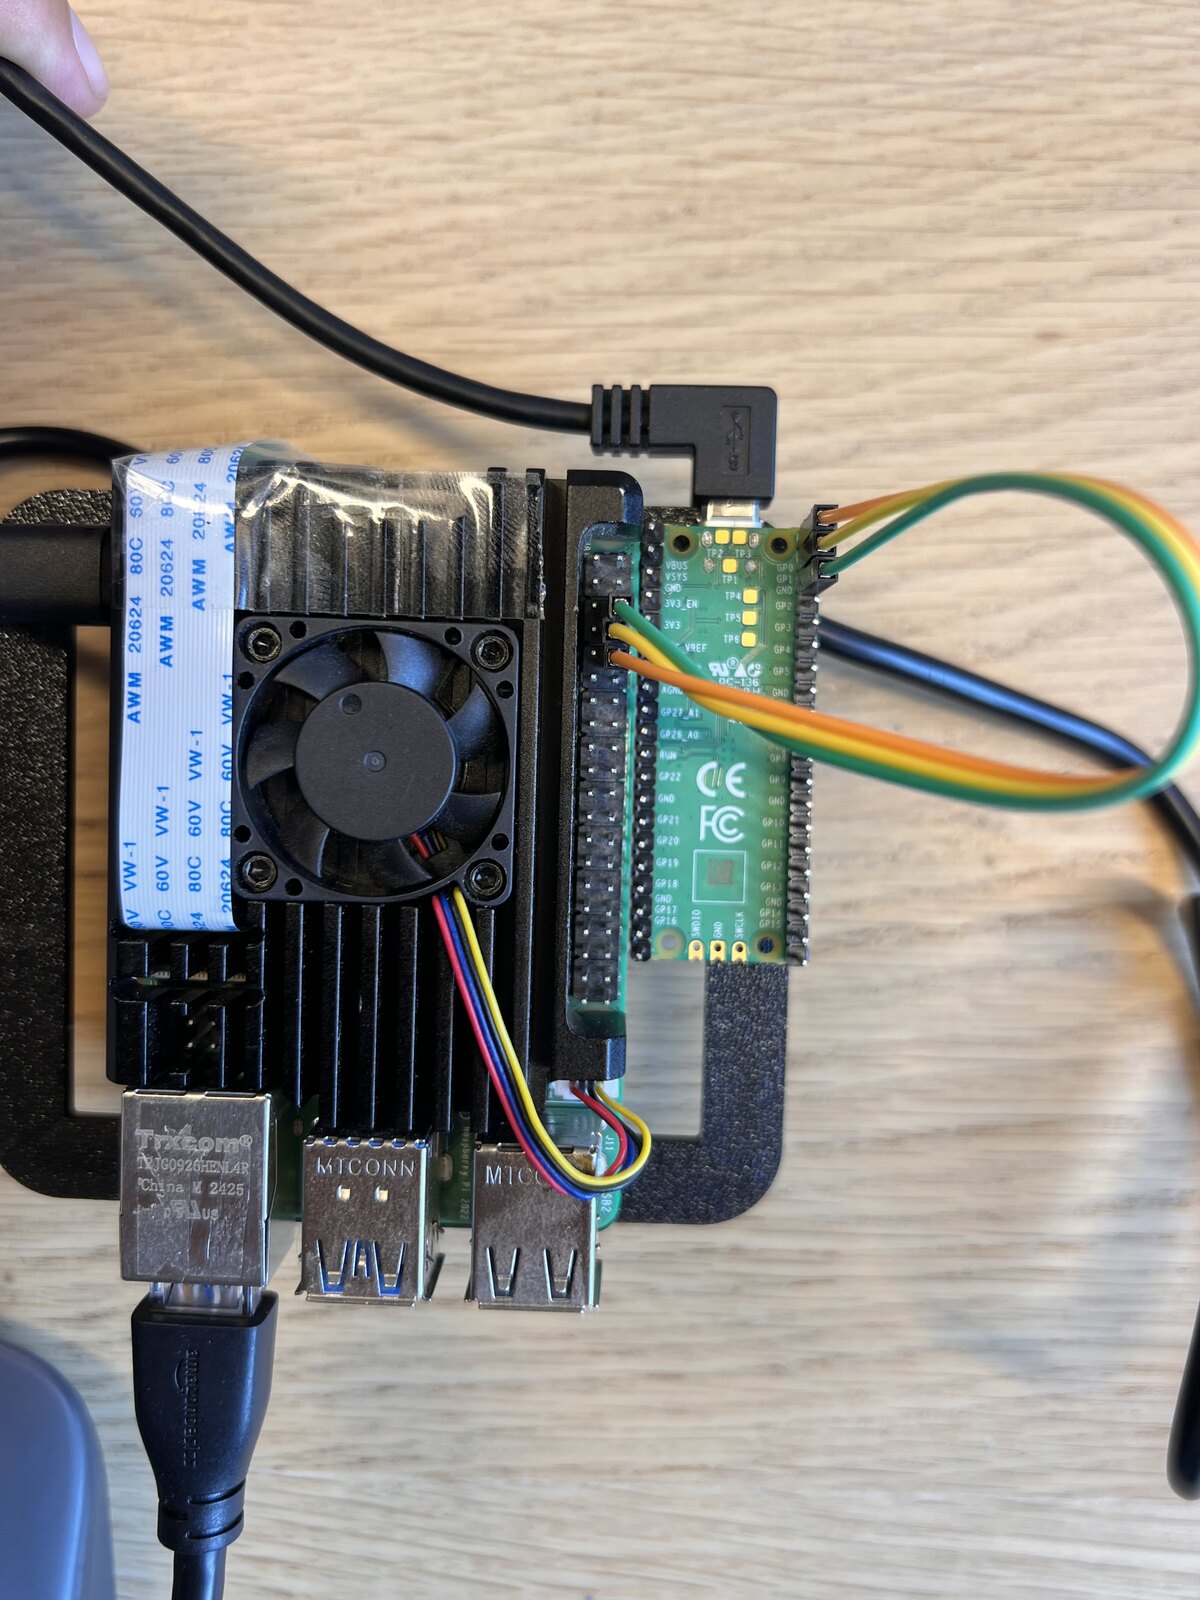
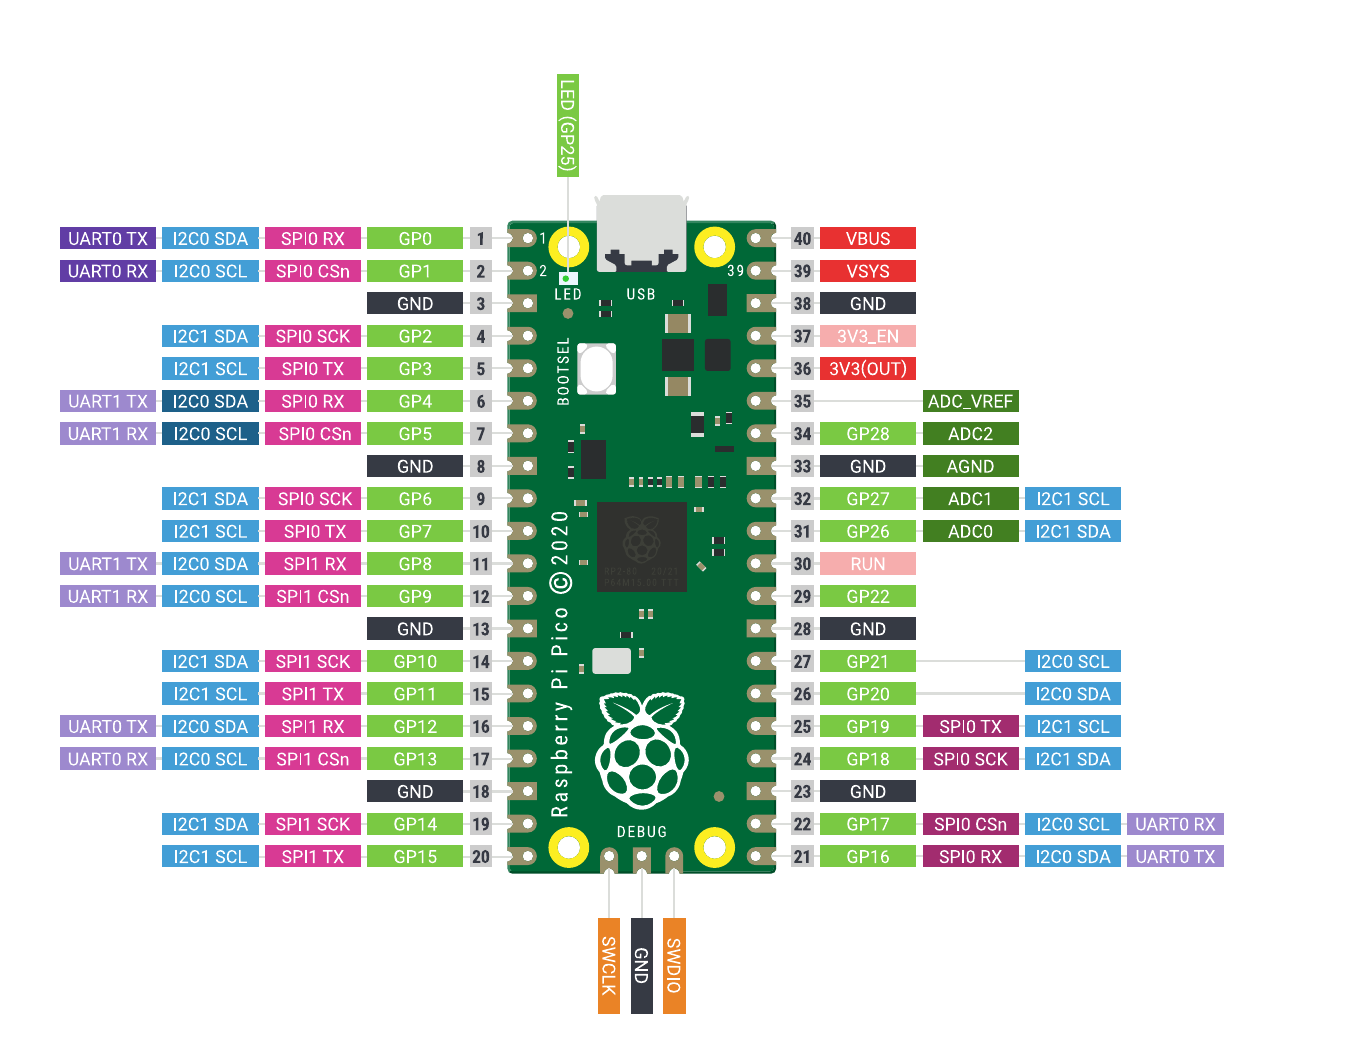
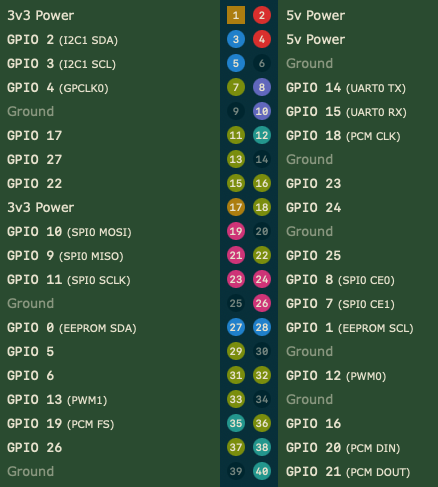
With the UF2 from this guide, the Pico acts as a USB-UART adapter using GP0 and GP1. The important rule is simple: TX always connects to RX, and RX always connects to TX.
| Raspberry Pi Pico with USB-UART UF2 | Function | Standard Raspberry Pi |
|---|---|---|
| GP0, physical pin 1 | Pico TX | GPIO15 / RXD, physical pin 10 |
| GP1, physical pin 2 | Pico RX | GPIO14 / TXD, physical pin 8 |
| GND, for example physical pin 3 | Common ground | GND, for example physical pin 6 |
Connect GND first, then TX/RX, especially when both devices are powered from different supplies. The Pico is powered by the USB cable connected to the computer; the Raspberry Pi must use its own power supply.
4. Enable the serial console on the Raspberry Pi
The goal is to enable a Linux console with a login prompt, not to use UART for a sensor or custom application.
sudo raspi-configUsual path:
Interface Options
└── Serial Port
Answer:
Would you like a login shell to be accessible over serial? Yes
Would you like the serial port hardware to be enabled? Yes
sudo rebootFor this use case, both things must be enabled: UART hardware and login shell over UART. In projects with sensors, GPS, or other peripherals, you normally enable the hardware but disable the console.
grep -o 'console=[^ ]*' /boot/firmware/cmdline.txt
systemctl status serial-getty@serial0.service
ls -l /dev/serial05. Optional manual configuration
Only if raspi-config does not work. Usually you need:
# /boot/firmware/config.txt
enable_uart=1

# On the single line in /boot/firmware/cmdline.txt
console=serial0,115200
Do not overwrite cmdline.txt entirely. The exact content depends on the Raspberry Pi OS version and the Raspberry Pi model.
ls -l /dev/serial*
pinctrl get 14
pinctrl get 15
grep -E 'enable_uart|dtoverlay' /boot/firmware/config.txt
6. Connect from macOS
- Install and configure the Raspberry Pi Pico correctly if this has not been done yet (follow these steps).
ls /dev/cu.usbmodem*
ls /dev/cu.*
To compare before and after connecting the Pico:
ls /dev/cu.* > /tmp/ports-before.txt
# Connect the Pico
ls /dev/cu.* > /tmp/ports-after.txt
diff /tmp/ports-before.txt /tmp/ports-after.txt
The port usually looks similar to /dev/cu.usbmodemXXXX, but the exact name changes between computers and connections.
screen /dev/cu.usbmodemXXXX 115200The configuration is 115200 8N1: 115200 baud, 8 data bits, no parity, 1 stop bit, and no flow control.
To exit screen: press Ctrl+A, then \ and confirm with y.
brew install minicom
minicom -D /dev/cu.usbmodemXXXX -b 115200
If Homebrew is not installed, check its official site: brew.sh.
lsof | grep usbmodem
screen -ls
screen -r
screen -D -r
7. Connect from Linux
ls /dev/ttyACM*
dmesg --follow
sudo dmesg --follow
sudo apt update
sudo apt install minicom
minicom -D /dev/ttyACM0 -b 115200
screen /dev/ttyACM0 115200Do not always assume /dev/ttyACM0: it may appear as /dev/ttyACM1, /dev/ttyUSB0, or another device.
ls -l /dev/ttyACM0
sudo usermod -aG dialout "$USER"
After adding the user to the relevant group, log out and log back in. Do not use chmod 777 on the device.
8. Connect from Windows with PuTTY
Install PuTTY from Microsoft Store after verifying the official package, from the official installer at chiark.greenend.org.uk/~sgtatham/putty/latest.html, or with winget after checking the exact package identifier:
winget search PuTTYConnect the Pico, open Device Manager, expand “Ports (COM & LPT)”, look for a USB serial or CMSIS-DAP device, and note the port, for example COM5.
Get-CimInstance Win32_SerialPort |
    Select-Object DeviceID, Name, Description
In PuTTY:
- Connection type: Serial
- Serial line: COM5
- Speed: 115200
- Connection -> Serial: 8 data bits, 1 stop bit, parity None, flow control None
If the window appears blank, press Enter once or twice. To close cleanly, run exit before closing the window.
9. Log in
Use an existing user on the Raspberry Pi. The password shows no characters, dots, or asterisks while you type; this is normal on Linux. After authentication, you get a real Raspberry Pi shell, independent of Wi-Fi, Ethernet, or SSH.
hostname
ip address
uname -a
systemctl --failed
journalctl -b -p warning
10. Troubleshooting
| Symptom | Possible cause | Fix |
|---|---|---|
| No serial port appears | Charge-only cable, wrong UF2, USB problem, or Pico still in BOOTSEL mode. | Try another data cable, reinstall the UF2, check Device Manager, /dev/cu.* or /dev/ttyACM*, and reconnect the Pico. |
| The port exists, but no text appears | TX/RX not crossed, missing common GND, serial console disabled, wrong speed, wrong port, or Raspberry Pi powered off. | Verify wiring, press Enter, reboot with the terminal already open, and confirm console=serial0,115200 and serial-getty. |
| Unreadable characters appear | Wrong baud rate, configuration other than 8N1, flow control enabled, or UART incorrectly mapped. | Use 115200 baud, 8 bits, no parity, 1 stop bit, and no flow control. |
| Messages appear, but no login prompt | UART hardware enabled, but login console disabled, or getty not running. | Check serial0 and run systemctl status serial-getty@serial0.service. If appropriate: sudo systemctl enable --now serial-getty@serial0.service. |
| You can read, but not type | The Pico TX -> Pi RX line works, but the Pi TX -> Pico RX line does not; GP0/GP1 swapped; bad cable; flow control enabled. | Check the return line, replace the suspect wire, and disable flow control. |
| screen shows “Resource busy” | Another program or session is keeping the port open. | Run lsof | grep -E 'usbmodem|ttyACM|ttyUSB' and close the process or recover/close the screen session. |
| The console works, but SSH does not | UART and SSH are independent mechanisms. | Use UART to repair networking, firewall, IP address, SSH keys, services, or boot errors. |
Configure the Pico correctly and flash the UART bridge UF2
After using Thonny for MicroPython or to check that the Mac detects the board, the UART bridge is not flashed again with Thonny. For this setup, use the Pico BOOTSEL mode and copy an already compiled .uf2 file directly to the RPI-RP2 drive.
This custom firmware turns the Pico into a USB-UART bridge using Serial over USB and Serial1 over UART0. This UF2 uses GP0 as TX and GP1 as RX.
Download the precompiled UF2 to flash it directly onto the Pico. The Arduino sketch is included in case you want to review the code or rebuild it yourself.
SHA-256: e81d2f46e79dbd3f2e4d864bf0d03309dcfa2fd98e372a13236c1359cc6459a8
Exact steps from macOS
- Put the Pico in BOOTSEL mode: unplug USB, hold BOOTSEL, plug USB back in, wait 2-3 seconds, then release BOOTSEL.
- Check that macOS sees it as a mounted volume.
ls /VolumesYou should see:
RPI-RP2- Download the already compiled UF2 firmware from this page.
pico_usb_uart_bridge.ino.uf2- Copy that file to the Pico mounted as RPI-RP2.
cp ~/Downloads/pico_usb_uart_bridge.ino.uf2 /Volumes/RPI-RP2/- When the copy finishes, the Pico reboots by itself and comes back as a serial port. The exact name can change; in this setup it appeared as:
/dev/cu.usbmodem21201- Open the Pico as a 115200-baud serial port, replacing the port if macOS assigned a different name.
minicom -D /dev/cu.usbmodem21201 -b 115200- To exit minicom, press Ctrl-A, then X.
- Connect Pico GP0 TX to Raspberry Pi GPIO15/RXD, Pico GP1 RX to Raspberry Pi GPIO14/TXD, and GND to GND.
The pico_usb_uart_bridge.ino.uf2 file is produced by compiling the downloadable Arduino/C++ sketch from this page with binary export enabled. If you want to rebuild it with arduino-cli, create a sketch folder named pico_usb_uart_bridge and save pico_usb_uart_bridge.ino inside it:
arduino-cli compile --export-binaries -b rp2040:rp2040:rpipico pico_usb_uart_bridge- If RPI-RP2 does not appear, the Pico is not in BOOTSEL mode.
- If /dev/cu.usbmodem* does not appear, macOS is not detecting the Pico.
- If minicom shows Resource busy, another program is using the port. Close Thonny, screen, Arduino IDE, or any other serial terminal.
- The pico_usb_uart_bridge firmware turns the Pico into a 115200-baud USB-UART bridge.
Firmware source code
// Raspberry Pi Pico USB <-> UART bridge for Raspberry Pi serial console.
static constexpr uint32_t UART_BAUD = 115200;
static constexpr int UART_TX_PIN = 0;  // GP0 -> Pi RXD GPIO15, pin 10
static constexpr int UART_RX_PIN = 1;  // GP1 <- Pi TXD GPIO14, pin 8

void setup() {
  Serial.begin(115200);
  Serial1.setTX(UART_TX_PIN);
  Serial1.setRX(UART_RX_PIN);
  Serial1.begin(UART_BAUD);
  Serial.ignoreFlowControl(true);

  unsigned long start = millis();
  while (!Serial && (millis() - start < 1500)) {
    delay(10);
  }

  delay(200);
  while (Serial.available()) {
    Serial.read();
  }

  Serial.println("Pico USB-UART bridge ready (GP0 TX, GP1 RX, 115200)");
}

void loop() {
  while (Serial.available()) {
    Serial1.write(Serial.read());
  }

  while (Serial1.available()) {
    Serial.write(Serial1.read());
  }
}